1 2 3 4 5 <dependency > <groupId > com.alibaba.cloud</groupId > <artifactId > spring-cloud-starter-alibaba-nacos-config</artifactId > <version > 2.1.3.RELEASE</version > </dependency >
然后在bootstrap.yml添加对应的nacos连接配置信息即可
1
2
3
4
5
6
7
8
9
10
11
12
13
14
15
16
17
spring: application: name: cn-bullet-demo-rest cloud: nacos: config: file-extension: yml shared-dataids: cn-bullet-common.yml refreshable-dataids: ${spring.cloud.nacos.config.shared-dataids},${spring.application.name}.yml ext-config[0]: data-id: ${spring.application.name}-redisson.yml refresh: true server-addr: ${DISCOVERY_ADDRESS:127.0.0.1}:8848 namespace: ${DISCOVERY_NAMESPACE:dev} discovery: server-addr: ${DISCOVERY_ADDRESS:127.0.0.1}:8848 namespace: ${DISCOVERY_NAMESPACE:dev}
另外还需要在nacos上新建cn-bullet-demo-rest.yml配置文件的内容。
Spring Cloud 构建于 Spring Boot 之上,在 Spring Boot 中有两种上下文,一种是 bootstrap, 另外一种是 application。 bootstrap 是应用程序的父上下文,也就是说 bootstrap 加载优先于 applicaton。bootstrap主要用于从额外的资源来加载配置信息,还可以在本地外部配置文件中解密属性。这两个上下文共用一个环境,它是任何Spring应用程序的外部属性的来源。bootstrap 里面的属性会优先加载,它们默认也不能被本地相同配置覆盖。
对比 application 配置文件,bootstrap 配置文件具有以下几个特性:
boostrap 由父 ApplicationContext 加载,比 applicaton 优先加载
boostrap 里面的属性不能被覆盖
application 配置文件主要用于 Spring Boot 项目的自动化配置。
使用 Spring Cloud Config或nacos 配置中心时,这时需要在 bootstrap 配置文件中添加连接到配置中心的配置属性来加载外部配置中心的配置信息;
一些固定的不能被覆盖的属性
一些加密/解密的场景
file:./config/
file:./
classpath:/config/
classpath:/
以上顺序按照优先级从高到低的顺序,所有位置的文件都会被加载,高优先级的配置内容会覆盖低优先级配置的内容,其中配置文件中的内容是互补配置,即
存在相同的配置内容,高优先级的内容会覆盖低优先级的内容
存在不同的内容的时候,高优先级和低优先级的配置内容取并集
这个配置作用是spring在启动之间准备上下文时会启用这个配置来导入nacos相关配置文件,为后续容器启动做准备。对应的配置类NacosConfigBootstrapConfiguration如下:
1
2
3
4
5
6
7
8
9
10
11
12
13
14
15
16
17
18
19
20
21
22
23
24
25
26
@Configuration @ConditionalOnProperty( name = {"spring.cloud.nacos.config.enabled"}, matchIfMissing = true ) public class NacosConfigBootstrapConfiguration public NacosConfigBootstrapConfiguration () } @Bean @ConditionalOnMissingBean public NacosConfigProperties nacosConfigProperties () return new NacosConfigProperties(); } @Bean @ConditionalOnMissingBean public NacosConfigManager nacosConfigManager (NacosConfigProperties nacosConfigProperties) return new NacosConfigManager(nacosConfigProperties); } @Bean public NacosPropertySourceLocator nacosPropertySourceLocator (NacosConfigManager nacosConfigManager) return new NacosPropertySourceLocator(nacosConfigManager); } }
NacosConfigProperties:对应我们上面在bootstrap.yml中对应的配置信息
NacosConfigManager: 持有NacosConfigProperties和ConfigService,ConfigService用来查询发布配置的相关接口
NacosPropertySourceLocator : 它实现了PropertySourceLocator,Spring Boot启动时调用PropertySourceLocator.locate(env)用来加载配置信息
我们来看下PropertySourceLocator类相关代码:
1
2
3
4
5
6
7
8
9
10
11
12
13
14
15
16
17
18
19
20
21
22
23
24
25
26
27
28
29
30
31
32
33
34
35
36
37
38
39
40
41
42
43
44
45
46
47
48
49
50
51
@Order(0) public class NacosPropertySourceLocator implements PropertySourceLocator private static final Logger log = LoggerFactory.getLogger(NacosPropertySourceLocator.class); private static final String NACOS_PROPERTY_SOURCE_NAME = "NACOS" ; private static final String SEP1 = "-" ; private static final String DOT = "." ; private NacosPropertySourceBuilder nacosPropertySourceBuilder; private NacosConfigProperties nacosConfigProperties; private NacosConfigManager nacosConfigManager; public NacosPropertySourceLocator (NacosConfigManager nacosConfigManager) this .nacosConfigManager = nacosConfigManager; this .nacosConfigProperties = nacosConfigManager.getNacosConfigProperties(); } public PropertySource<?> locate(Environment env) { this .nacosConfigProperties.setEnvironment(env); ConfigService configService = this .nacosConfigManager.getConfigService(); if (null == configService) { log.warn("no instance of config service found, can't load config from nacos" ); return null ; } else { long timeout = (long )this .nacosConfigProperties.getTimeout(); this .nacosPropertySourceBuilder = new NacosPropertySourceBuilder(configService, timeout); String name = this .nacosConfigProperties.getName(); String dataIdPrefix = this .nacosConfigProperties.getPrefix(); if (StringUtils.isEmpty(dataIdPrefix)) { dataIdPrefix = name; } if (StringUtils.isEmpty(dataIdPrefix)) { dataIdPrefix = env.getProperty("spring.application.name" ); } CompositePropertySource composite = new CompositePropertySource("NACOS" ); this .loadSharedConfiguration(composite); this .loadExtConfiguration(composite); this .loadApplicationConfiguration(composite, dataIdPrefix, this .nacosConfigProperties, env); return composite; } } private NacosPropertySource loadNacosPropertySource (final String dataId, final String group, String fileExtension, boolean isRefreshable) return NacosContextRefresher.getRefreshCount() != 0L && !isRefreshable ? NacosPropertySourceRepository.getNacosPropertySource(dataId, group) : this .nacosPropertySourceBuilder.build(dataId, group, fileExtension, isRefreshable); } ... }
在真正加载配置文件loadNacosPropertySource()的时候,会调用到nacosPropertySourceBuilder.build()方法,我们在看下build干了什么。
1
2
3
4
5
6
7
8
9
10
11
12
13
14
15
16
17
18
19
20
21
22
23
24
25
26
27
28
29
30
31
32
33
34
35
36
37
38
39
40
41
42
43
44
45
46
47
48
49
50
51
52
53
54
55
56
57
58
59
60
public class NacosPropertySourceBuilder private static final Logger log = LoggerFactory.getLogger(NacosPropertySourceBuilder.class); private static final Map<String, Object> EMPTY_MAP = new LinkedHashMap(); private ConfigService configService; private long timeout; public NacosPropertySourceBuilder (ConfigService configService, long timeout) this .configService = configService; this .timeout = timeout; } public long getTimeout () return this .timeout; } public void setTimeout (long timeout) this .timeout = timeout; } public ConfigService getConfigService () return this .configService; } public void setConfigService (ConfigService configService) this .configService = configService; } NacosPropertySource build (String dataId, String group, String fileExtension, boolean isRefreshable) { Map<String, Object> p = this .loadNacosData(dataId, group, fileExtension); NacosPropertySource nacosPropertySource = new NacosPropertySource(group, dataId, p, new Date(), isRefreshable); NacosPropertySourceRepository.collectNacosPropertySource(nacosPropertySource); return nacosPropertySource; } private Map<String, Object> loadNacosData (String dataId, String group, String fileExtension) String data = null ; try { data = this .configService.getConfig(dataId, group, this .timeout); if (StringUtils.isEmpty(data)) { log.warn("Ignore the empty nacos configuration and get it based on dataId[{}] & group[{}]" , dataId, group); return EMPTY_MAP; } if (log.isDebugEnabled()) { log.debug(String.format("Loading nacos data, dataId: '%s', group: '%s', data: %s" , dataId, group, data)); } Map<String, Object> dataMap = NacosDataParserHandler.getInstance().parseNacosData(data, fileExtension); return dataMap == null ? EMPTY_MAP : dataMap; } catch (NacosException var6) { log.error("get data from Nacos error,dataId:{}, " , dataId, var6); } catch (Exception var7) { log.error("parse data from Nacos error,dataId:{},data:{}," , new Object[]{dataId, data, var7}); } return EMPTY_MAP; } }
可以看到build后面调用了loadNacosData,在loadNacosData中,先是configService.getConfig向配置中心拉去配置文件,然后在parseNacosData()解析配置文件。
1
2
3
4
5
6
7
8
9
10
11
12
13
14
15
16
17
18
19
20
21
22
23
24
25
26
27
28
29
30
31
32
33
34
35
36
37
38
39
40
41
42
43
44
45
public final class NacosDataParserHandler private AbstractNacosDataParser parser; private NacosDataParserHandler () this .parser = this .createParser(); } public Map<String, Object> parseNacosData (String data, String extension) throws IOException if (null == this .parser) { this .parser = this .createParser(); } return this .parser.parseNacosData(data, extension); } public boolean checkDataId (String... dataIdAry) StringBuilder stringBuilder = new StringBuilder(); String[] var3 = dataIdAry; int var4 = dataIdAry.length; for (int var5 = 0 ; var5 < var4; ++var5) { String dataId = var3[var5]; int idx = dataId.lastIndexOf("." ); if (idx > 0 && idx < dataId.length() - 1 ) { String extension = dataId.substring(idx + 1 ); if (this .parser.checkFileExtension(extension)) { break ; } } stringBuilder.append(dataId).append("," ); } if (stringBuilder.length() > 0 ) { String result = stringBuilder.substring(0 , stringBuilder.length() - 1 ); throw new IllegalStateException(AbstractNacosDataParser.getTips(result)); } else { return true ; } } private AbstractNacosDataParser createParser () return (new NacosDataPropertiesParser()).addNextParser(new NacosDataYamlParser()).addNextParser(new NacosDataXmlParser()).addNextParser(new NacosDataJsonParser()); } }
当nacos上配置文件内容更新后,根据配置中的refresh属性来判断是否刷新配置,配置如下:
1 spring.cloud.nacos.config.refresh.enabled=true
该参数表示是否开启自动更新。增加了spring.cloud.nacos.config.ext-config[0].refresh=true配置后在修改了Nacos中的配置过后日志会出现下面信息,会重新加载配置,并且输出变更的key信息。@RefreshScope 注解。spring.cloud.nacos.config.refresh.enabled=true仅仅标识客户端会自动从远端拉取最新的配置 ,具体的@Value以及@Refresh Bean的刷新和spring-cloud的机制有关系。
大致的过程:NacosConfigAutoConfiguration 配置类会注入一个NacosContextRefresher ,它首先监听了ApplicationReadyEvent,然后注册一个nacos listener用来监听nacos config配置修改后发布一个spring refreshEvent 用来刷新配置和应用。如果需要对Bean进行动态刷新,需要给类添加@RefreshScope或@ConfigurationProperties注解。
NacosConfigAutoConfiguration.java
1
2
3
4
5
6
7
8
9
public class NacosConfigAutoConfiguration public NacosConfigAutoConfiguration () } ... @Bean public NacosContextRefresher nacosContextRefresher (NacosConfigManager nacosConfigManager, NacosRefreshHistory nacosRefreshHistory) return new NacosContextRefresher(nacosConfigManager, nacosRefreshHistory); } }
NacosContextRefresher.java
1
2
3
4
5
6
7
8
9
10
11
12
13
14
15
16
17
18
19
20
21
22
23
24
25
26
27
28
29
30
31
32
33
34
35
36
37
38
39
40
41
42
43
44
45
46
47
48
49
50
51
52
53
54
55
56
57
58
59
60
61
62
63
64
65
66
67
68
69
70
71
72
73
74
75
76
77
78
79
80
81
82
83
84
85
86
87
88
89
90
91
92
93
94
95
96
97
98
99
100
101
102
103
104
105
106
107
108
109
110
111
112
113
public class NacosContextRefresher implements ApplicationListener <ApplicationReadyEvent >, ApplicationContextAware private static final Logger log = LoggerFactory.getLogger(NacosContextRefresher.class); private static final AtomicLong REFRESH_COUNT = new AtomicLong(0L ); private NacosConfigProperties nacosConfigProperties; private final boolean isRefreshEnabled; private final NacosRefreshHistory nacosRefreshHistory; private final ConfigService configService; private ApplicationContext applicationContext; private AtomicBoolean ready = new AtomicBoolean(false ); private Map<String, Listener> listenerMap = new ConcurrentHashMap(16 ); public NacosContextRefresher (NacosConfigManager nacosConfigManager, NacosRefreshHistory refreshHistory) this .nacosConfigProperties = nacosConfigManager.getNacosConfigProperties(); this .nacosRefreshHistory = refreshHistory; this .configService = nacosConfigManager.getConfigService(); this .isRefreshEnabled = this .nacosConfigProperties.isRefreshEnabled(); } public void onApplicationEvent (ApplicationReadyEvent event) if (this .ready.compareAndSet(false , true )) { this .registerNacosListenersForApplications(); } } public void setApplicationContext (ApplicationContext applicationContext) this .applicationContext = applicationContext; } private void registerNacosListenersForApplications () if (this .isRefreshEnabled()) { Iterator var1 = NacosPropertySourceRepository.getAll().iterator(); while (var1.hasNext()) { NacosPropertySource propertySource = (NacosPropertySource)var1.next(); if (propertySource.isRefreshable()) { String dataId = propertySource.getDataId(); this .registerNacosListener(propertySource.getGroup(), dataId); } } } } private void registerNacosListener (final String group, final String dataId) Listener listener = (Listener)this .listenerMap.computeIfAbsent(dataId, (i) -> { return new Listener() { public void receiveConfigInfo (String configInfo) NacosContextRefresher.refreshCountIncrement(); String md5 = "" ; if (!StringUtils.isEmpty(configInfo)) { try { MessageDigest md = MessageDigest.getInstance("MD5" ); md5 = (new BigInteger(1 , md.digest(configInfo.getBytes("UTF-8" )))).toString(16 ); } catch (UnsupportedEncodingException | NoSuchAlgorithmException var4) { NacosContextRefresher.log.warn("[Nacos] unable to get md5 for dataId: " + dataId, var4); } } NacosContextRefresher.this .refreshHistory.add(dataId, md5); NacosContextRefresher.this .applicationContext.publishEvent(new RefreshEvent(this , (Object)null , "Refresh Nacos config" )); if (NacosContextRefresher.log.isDebugEnabled()) { NacosContextRefresher.log.debug("Refresh Nacos config group " + group + ",dataId" + dataId); } } public Executor getExecutor () return null ; } }; }); try { this .configService.addListener(dataId, group, listener); } catch (NacosException var5) { var5.printStackTrace(); } } public NacosConfigProperties getNacosConfigProperties () return this .nacosConfigProperties; } public NacosContextRefresher setNacosConfigProperties (NacosConfigProperties nacosConfigProperties) this .nacosConfigProperties = nacosConfigProperties; return this ; } public boolean isRefreshEnabled () if (null == this .nacosConfigProperties) { return this .isRefreshEnabled; } else { return this .nacosConfigProperties.isRefreshEnabled() && !this .isRefreshEnabled ? false : this .isRefreshEnabled; } } public static long getRefreshCount () return REFRESH_COUNT.get(); } public static void refreshCountIncrement () REFRESH_COUNT.incrementAndGet(); } }
nacos config starter默认为所有获取数据成功的nacos的配置项添加了监听功能,nacos config会监听nacos server上配置更新变化。在监听到服务端配置发生变化时会实时触发org.springframework.cloud.context.refresh.ContextRefresher的refresh方法。
一般客户端和服务端数据交互数据有以下两种:
pull:客户端主动从服务器拉取数据
push: 由服务端主动向客户端推送数据
nacos采用的是pull 模式,但它作了优化可以看做是pull+push,客户端会轮询向服务端发出一个长连接请求,这个长连接最多30s就会超时。服务端收到客户端的请求会先判断当前是否有配置更新,有则立即返回。
动态监听的发起是在ConfigService的实现类NacosConfigService的构造方法中,它是对外nacos config api接口。NacosConfigService的实例化在NacosContextRefresher构造方法中都会获取或创建。
1 2 3 4 5 6 7 8 9 10 11 12 13 14 15 16 17 18 19 20 21 22 23 24 25 26 27 28 29 30 public class NacosConfigAutoConfiguration ... @Bean public NacosContextRefresher nacosContextRefresher (NacosConfigProperties nacosConfigProperties, NacosRefreshProperties nacosRefreshProperties, NacosRefreshHistory refreshHistory) return new NacosContextRefresher(nacosRefreshProperties, refreshHistory, nacosConfigProperties.configServiceInstance()); } } public class NacosContextRefresher implements ApplicationListener <ApplicationReadyEvent >, ApplicationContextAware private static final Logger log = LoggerFactory.getLogger(NacosContextRefresher.class); private static final AtomicLong REFRESH_COUNT = new AtomicLong(0L ); private final NacosRefreshProperties refreshProperties; private final NacosRefreshHistory refreshHistory; private final ConfigService configService; private ApplicationContext applicationContext; private AtomicBoolean ready = new AtomicBoolean(false ); private Map<String, Listener> listenerMap = new ConcurrentHashMap(16 ); public NacosContextRefresher (NacosRefreshProperties refreshProperties, NacosRefreshHistory refreshHistory, ConfigService configService) this .refreshProperties = refreshProperties; this .refreshHistory = refreshHistory; this .configService = configService; } ... }
上面两个类在spring-cloud-alibaba-nacos-config:0.9.0.RELEASE.jar包
1
2
3
4
5
6
7
8
9
10
11
12
13
14
15
16
17
18
19
20
21
22
23
24
25
26
27
public class NacosConfigService implements ConfigService private static final Logger LOGGER = LogUtils.logger(NacosConfigService.class); private final long POST_TIMEOUT = 3000L ; private static final String EMPTY = "" ; private HttpAgent agent; private ClientWorker worker; private String namespace; private String encode; private ConfigFilterChainManager configFilterChainManager = new ConfigFilterChainManager(); public NacosConfigService (Properties properties) throws NacosException String encodeTmp = properties.getProperty("encode" ); if (StringUtils.isBlank(encodeTmp)) { this .encode = "UTF-8" ; } else { this .encode = encodeTmp.trim(); } this .initNamespace(properties); this .agent = new MetricsHttpAgent(new ServerHttpAgent(properties)); this .agent.start(); this .worker = new ClientWorker(this .agent, this .configFilterChainManager); } ... }
NacosConfigService、ClientWorker在nacos-client:1.0.0.jar包,
1
2
3
4
5
6
7
8
9
10
11
12
13
14
15
16
17
18
19
20
21
22
23
24
25
26
27
28
29
30
31
32
33
34
35
36
37
38
39
40
41
42
43
44
45
46
47
48
public ClientWorker (final HttpAgent agent, ConfigFilterChainManager configFilterChainManager) this .agent = agent; this .configFilterChainManager = configFilterChainManager; this .executor = Executors.newScheduledThreadPool(1 , new ThreadFactory() { public Thread newThread (Runnable r) Thread t = new Thread(r); t.setName("com.alibaba.nacos.client.Worker." + agent.getName()); t.setDaemon(true ); return t; } }); this .executorService = Executors.newCachedThreadPool(new ThreadFactory() { public Thread newThread (Runnable r) Thread t = new Thread(r); t.setName("com.alibaba.nacos.client.Worker.longPolling" + agent.getName()); t.setDaemon(true ); return t; } }); this .executor.scheduleWithFixedDelay(new Runnable() { public void run () try { ClientWorker.this .checkConfigInfo(); } catch (Throwable var2) { ClientWorker.LOGGER.error("[" + agent.getName() + "] [sub-check] rotate check error" , var2); } } }, 1L , 10L , TimeUnit.MILLISECONDS); } public void checkConfigInfo () int listenerSize = ((Map)this .cacheMap.get()).size(); int longingTaskCount = (int )Math.ceil((double )listenerSize / ParamUtil.getPerTaskConfigSize()); if ((double )longingTaskCount > this .currentLongingTaskCount) { for (int i = (int )this .currentLongingTaskCount; i < longingTaskCount; ++i) { this .executorService.execute(new ClientWorker.LongPollingRunnable(i)); } this .currentLongingTaskCount = (double )longingTaskCount; } }
可以看到 ClientWorker 除了将 HttpAgent 维持在自己内部,还创建了两个线程池:
第一个线程池是只拥有一个线程用来执行定时任务的 executor,executor 每隔 10ms 就会执行一次 checkConfigInfo() 方法,从方法名上可以知道是每 10 ms 检查一次配置信息。
第二个线程池是一个普通的线程池,从 ThreadFactory 的名称可以看到这个线程池是做长轮询的。
checkConfigInfo方法是取出了一批任务,然后提交给 executorService 线程池去执行,执行的任务就是 LongPollingRunnable,每个任务都有一个 taskId。
LongPollingRunnable的逻辑主要分为三部分,第一部分是检查本地的配置信息,第二部分是获取服务端的配置信息然后更新到本地,第三部分触发监听器receiveConfigInfo方法,发布RefreshEvent事件
1
2
3
4
5
6
7
8
9
10
11
12
13
14
15
16
17
18
19
20
21
22
23
24
25
26
27
28
29
30
31
32
33
34
35
36
37
38
39
40
41
42
43
44
45
46
47
48
49
50
51
52
53
54
55
56
57
58
59
60
61
62
63
64
65
66
67
68
69
70
71
72
73
74
75
76
77
78
79
80
81
82
83
84
class LongPollingRunnable implements Runnable private int taskId; public LongPollingRunnable (int taskId) this .taskId = taskId; } public void run () try { List<CacheData> cacheDatas = new ArrayList(); Iterator var2 = ((Map)ClientWorker.this .cacheMap.get()).values().iterator(); while (var2.hasNext()) { CacheData cacheDatax = (CacheData)var2.next(); if (cacheDatax.getTaskId() == this .taskId) { cacheDatas.add(cacheDatax); try { ClientWorker.this .checkLocalConfig(cacheDatax); if (cacheDatax.isUseLocalConfigInfo()) { cacheDatax.checkListenerMd5(); } } catch (Exception var18) { ClientWorker.LOGGER.error("get local config info error" , var18); } } } List<String> inInitializingCacheList = new ArrayList(); List<String> changedGroupKeys = ClientWorker.this .checkUpdateDataIds(cacheDatas, inInitializingCacheList); Iterator var4 = changedGroupKeys.iterator(); while (var4.hasNext()) { String groupKey = (String)var4.next(); String[] key = GroupKey.parseKey(groupKey); String dataId = key[0 ]; String group = key[1 ]; String tenant = null ; if (key.length == 3 ) { tenant = key[2 ]; } try { String content = ClientWorker.this .getServerConfig(dataId, group, tenant, 3000L ); CacheData cache = (CacheData)((Map)ClientWorker.this .cacheMap.get()).get(GroupKey.getKeyTenant(dataId, group, tenant)); cache.setContent(content); ClientWorker.LOGGER.info("[{}] [data-received] dataId={}, group={}, tenant={}, md5={}, content={}" , new Object[]{ClientWorker.this .agent.getName(), dataId, group, tenant, cache.getMd5(), ContentUtils.truncateContent(content)}); } catch (NacosException var17) { String message = String.format("[%s] [get-update] get changed config exception. dataId=%s, group=%s, tenant=%s" , ClientWorker.this .agent.getName(), dataId, group, tenant); ClientWorker.LOGGER.error(message, var17); } } var4 = cacheDatas.iterator(); while (true ) { CacheData cacheData; do { if (!var4.hasNext()) { inInitializingCacheList.clear(); return ; } cacheData = (CacheData)var4.next(); } while (cacheData.isInitializing() && !inInitializingCacheList.contains(GroupKey.getKeyTenant(cacheData.dataId, cacheData.group, cacheData.tenant))); cacheData.checkListenerMd5(); cacheData.setInitializing(false ); } } catch (Throwable var19) { ClientWorker.LOGGER.error("longPolling error" , var19); } finally { ClientWorker.this .executorService.execute(this ); } } }
首先取出与该 taskId 相关的 CacheData,然后对 CacheData 进行检查,包括本地配置检查和监听器的 md5 检查,本地检查主要是做一个故障容错,当服务端挂掉后,Nacos 客户端可以从本地的文件系统中获取相关的配置信息。${user.home}/nacos/config/${serverName}_nacos/data/config-data-tenant/${tenant}/${group}/${dataId},其中serverName的组成格式为fixed-${IP}_${Port}-${namespaceId}_nacos。其中,tenant为nameSpaceId,group
服务端检查
触发回调
1
2
3
4
5
6
7
8
9
10
11
12
13
14
15
16
17
18
19
20
21
22
23
24
25
26
27
28
29
30
31
32
33
34
35
36
37
38
39
40
41
42
43
44
45
void checkListenerMd5 () Iterator var1 = this .listeners.iterator(); while (var1.hasNext()) { ManagerListenerWrap wrap = (ManagerListenerWrap)var1.next(); if (!this .md5.equals(wrap.lastCallMd5)) { this .safeNotifyListener(this .dataId, this .group, this .content, this .md5, wrap); } } } private void safeNotifyListener (final String dataId, final String group, final String content, final String md5, final ManagerListenerWrap listenerWrap) final Listener listener = listenerWrap.listener; Runnable job = new Runnable() { public void run () ClassLoader myClassLoader = Thread.currentThread().getContextClassLoader(); ClassLoader appClassLoader = listener.getClass().getClassLoader(); try { ... Thread.currentThread().setContextClassLoader(appClassLoader); ConfigResponse cr = new ConfigResponse(); cr.setDataId(dataId); cr.setGroup(group); cr.setContent(content); CacheData.this .configFilterChainManager.doFilter((IConfigRequest)null , cr); String contentTmp = cr.getContent(); listener.receiveConfigInfo(contentTmp); listenerWrap.lastCallMd5 = md5; CacheData.LOGGER.info("[{}] [notify-ok] dataId={}, group={}, md5={}, listener={} " , new Object[]{CacheData.this .name, dataId, group, md5, listener}); } catch (NacosException var9) { CacheData.LOGGER.error("[{}] [notify-error] dataId={}, group={}, md5={}, listener={} errCode={} errMsg={}" , new Object[]{CacheData.this .name, dataId, group, md5, listener, var9.getErrCode(), var9.getErrMsg()}); } catch (Throwable var10) { CacheData.LOGGER.error("[{}] [notify-error] dataId={}, group={}, md5={}, listener={} tx={}" , new Object[]{CacheData.this .name, dataId, group, md5, listener, var10.getCause()}); } finally { Thread.currentThread().setContextClassLoader(myClassLoader); } } }; ... }
该方法会检查 CacheData 当前的 md5 与 CacheData 持有的所有 Listener 中保存的md5的值是否一致,如果不一致,就执行一个安全的监听器的通知方法:safeNotifyListener,通知 Listener 的使用者,该 Listener 所关注的配置信息已经发生改变了。
LongPollingRunnable 所执行的任务中,在获取服务端发生变更的配置信息时,将最新的 content 数据写入了 CacheData 中,我们可以看下该方法如下:
1
2
3
4
public void setContent (String newContent) this .content = newContent; this .md5 = getMd5String(this .content); }
在长轮询的任务中,当服务端配置信息发生变更时,客户端将最新的数据获取下来之后,保存在了 CacheData 中,同时更新了该 CacheData 的md5值,所以当下次执行checkListenerMd5 方法时,就会发现当前 listener 所持有的 md5 值已经和CacheData的md5值不一样了,也就意味着服务端的配置信息发生改变了,这时就需要将最新的数据通知给 Listener 的持有者。
从上文LongPollingRunnable长轮询任务,可以知道远程调用的接口URL为/v1/cs/configs/listener。对应的类为ConfigController
1 2 3 4 5 6 7 8 9 10 11 12 13 14 15 16 17 18 19 20 21 22 23 24 25 26 27 28 @PostMapping("/listener") @Secured(action = ActionTypes.READ, parser = ConfigResourceParser.class) public void listener (HttpServletRequest request, HttpServletResponse response) throws ServletException, IOException { request.setAttribute("org.apache.catalina.ASYNC_SUPPORTED" , true ); String probeModify = request.getParameter("Listening-Configs" ); if (StringUtils.isBlank(probeModify)) { LOGGER.warn("invalid probeModify is blank" ); throw new IllegalArgumentException("invalid probeModify" ); } probeModify = URLDecoder.decode(probeModify, Constants.ENCODE); Map<String, String> clientMd5Map; try { clientMd5Map = MD5Util.getClientMd5Map(probeModify); } catch (Throwable e) { throw new IllegalArgumentException("invalid probeModify" ); } inner.doPollingConfig(request, response, clientMd5Map, probeModify.length()); }
我们看下doPollingConfig方法,这里的inner 对象是 ConfigServletInner 类的实例,具体的方法如下所示:1 2 3 4 5 6 7 8 9 10 public String doPollingConfig (HttpServletRequest request, HttpServletResponse response, Map<String, String> clientMd5Map, int probeRequestSize) throws IOException if (LongPollingService.isSupportLongPolling(request)) { longPollingService.addLongPollingClient(request, response, clientMd5Map, probeRequestSize); return HttpServletResponse.SC_OK + "" ; } ... }
1 2 3 4 5 6 7 8 9 10 11 12 13 14 15 16 17 18 19 20 21 22 23 24 25 26 27 28 29 30 31 32 33 34 35 36 37 38 39 40 public void addLongPollingClient (HttpServletRequest req, HttpServletResponse rsp, Map<String, String> clientMd5Map, int probeRequestSize) String str = req.getHeader(LongPollingService.LONG_POLLING_HEADER); String noHangUpFlag = req.getHeader(LongPollingService.LONG_POLLING_NO_HANG_UP_HEADER); String appName = req.getHeader(RequestUtil.CLIENT_APPNAME_HEADER); String tag = req.getHeader("Vipserver-Tag" ); int delayTime = SwitchService.getSwitchInteger(SwitchService.FIXED_DELAY_TIME, 500 ); long timeout = Math.max(10000 , Long.parseLong(str) - delayTime); if (isFixedPolling()) { timeout = Math.max(10000 , getFixedPollingInterval()); } else { long start = System.currentTimeMillis(); List<String> changedGroups = MD5Util.compareMd5(req, rsp, clientMd5Map); if (changedGroups.size() > 0 ) { generateResponse(req, rsp, changedGroups); return ; } else if (noHangUpFlag != null && noHangUpFlag.equalsIgnoreCase(TRUE_STR)) { return ; } } String ip = RequestUtil.getRemoteIp(req); final AsyncContext asyncContext = req.startAsync(); asyncContext.setTimeout(0L ); ConfigExecutor.executeLongPolling( new ClientLongPolling(asyncContext, clientMd5Map, ip, probeRequestSize, timeout, appName, tag)); }
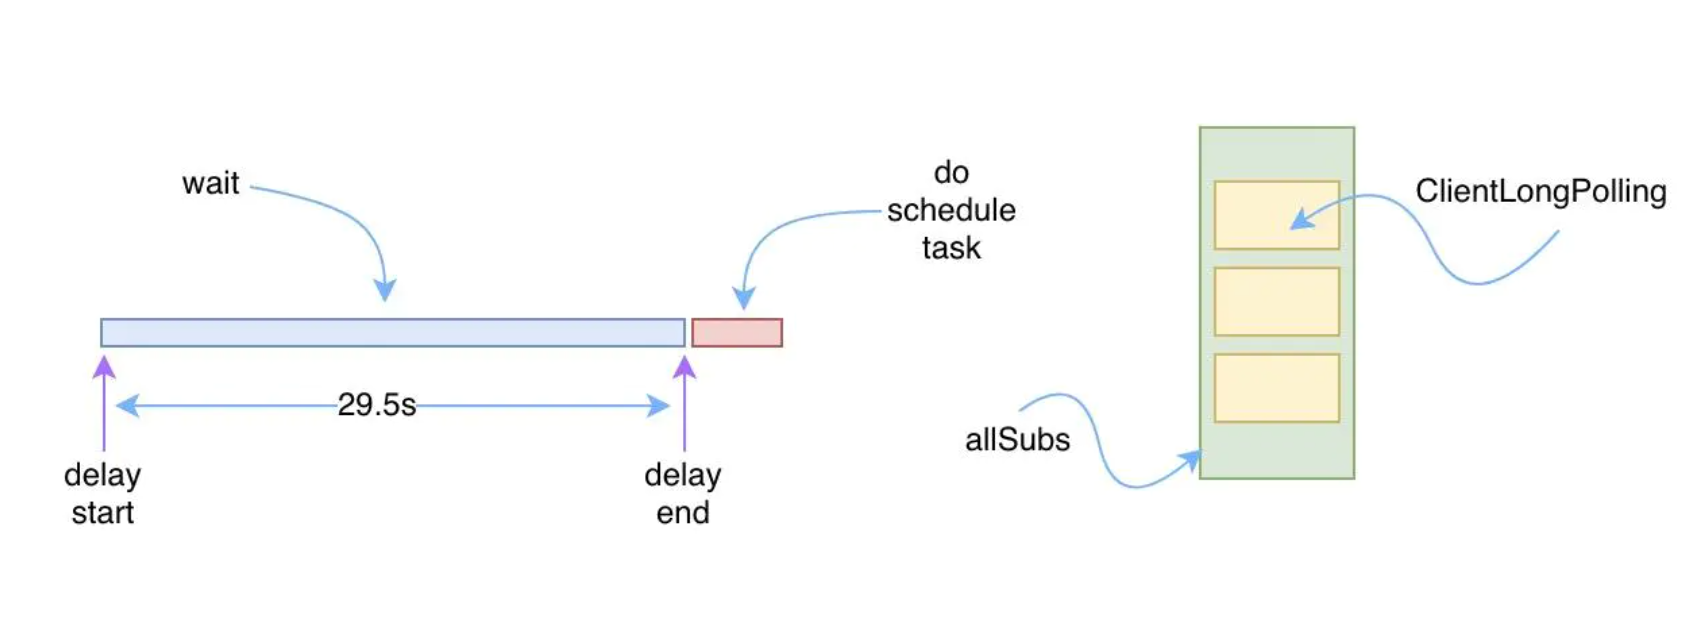
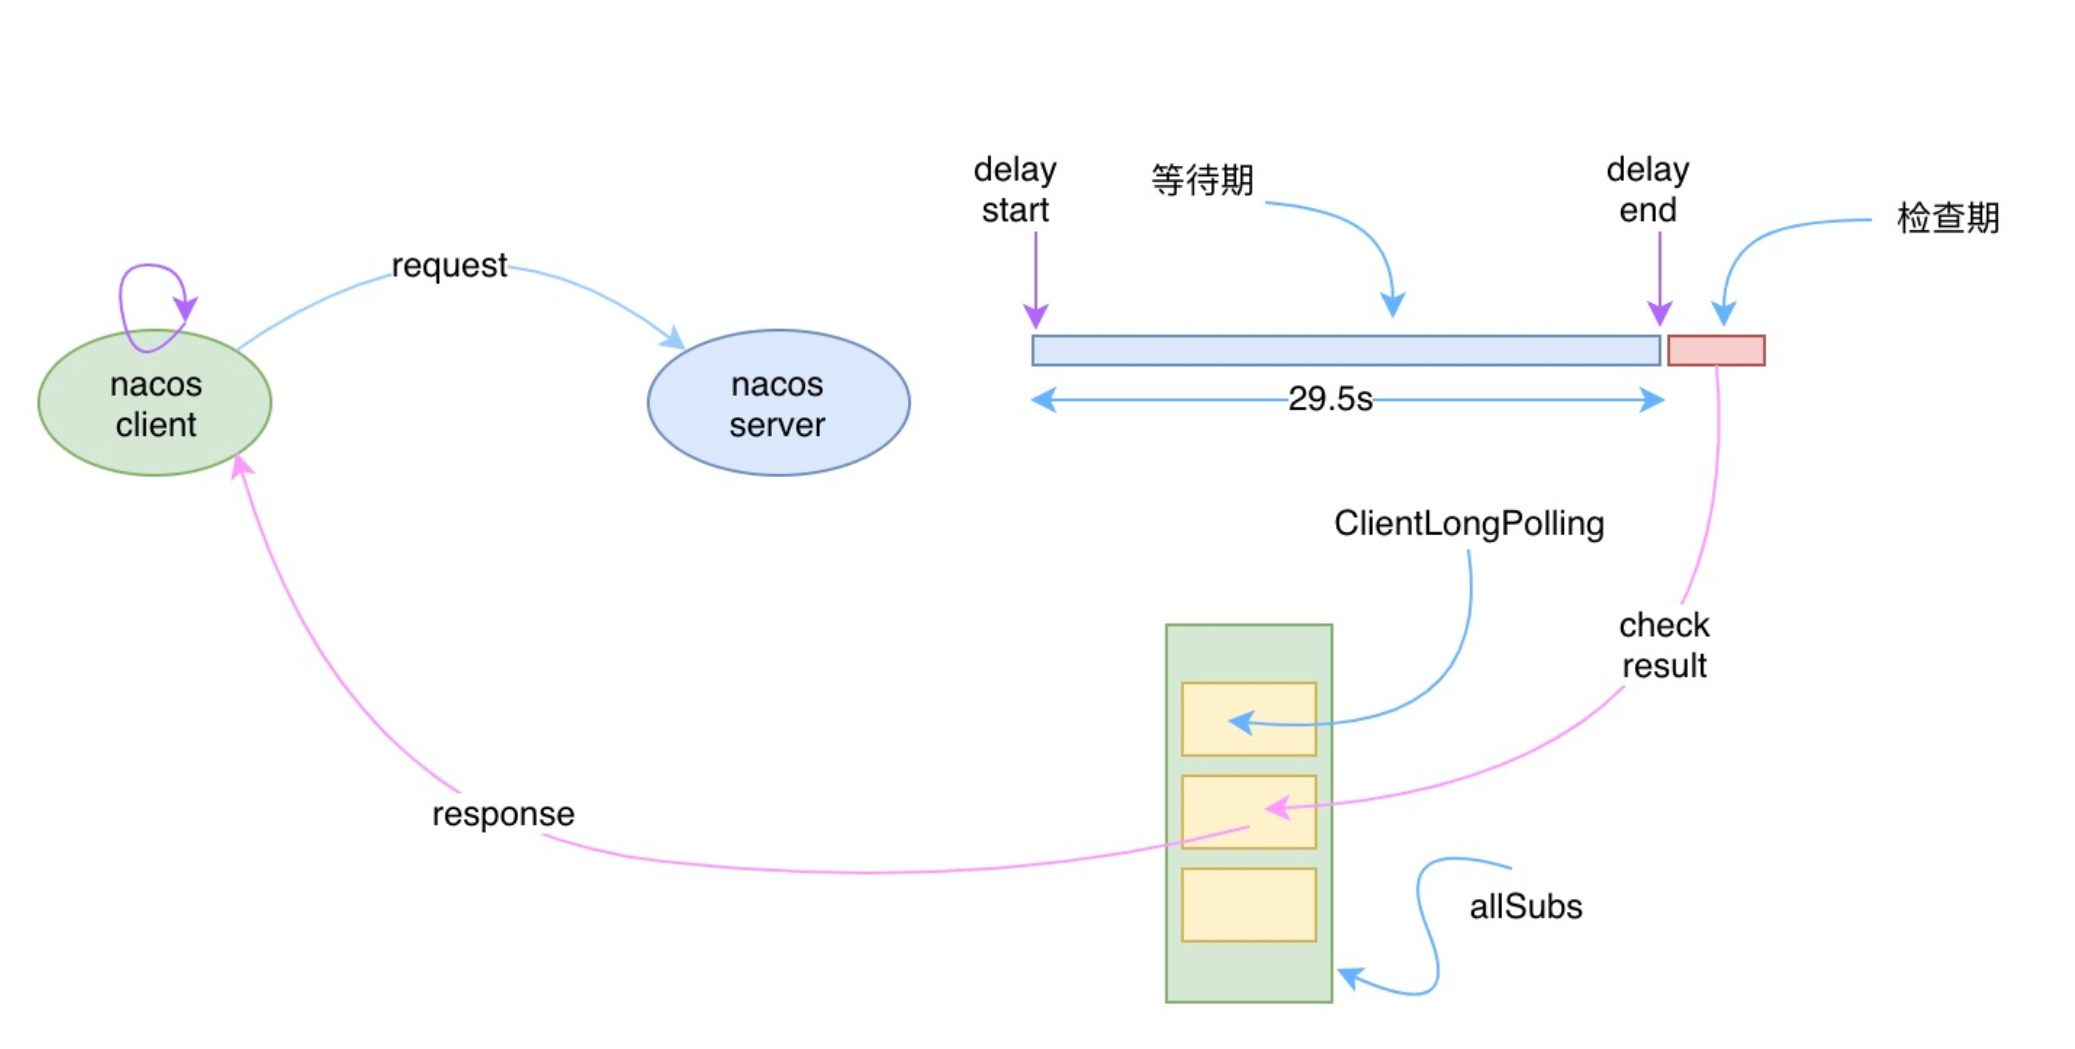
服务端将客户端的长轮询请求封装成一个叫 ClientLongPolling 的任务,交给 scheduler 去执行。服务端拿到客户端提交的超时时间后,又减去了 500ms 也就是说服务端在这里使用了一个比客户端提交的时间少 500ms 的超时时间,也就是 29.5s。
1 2 3 4 5 6 7 8 9 10 11 12 13 14 15 16 17 18 19 20 21 22 23 24 25 26 27 28 29 30 31 32 33 34 35 36 37 38 39 40 41 42 43 44 45 46 47 48 49 class ClientLongPolling implements Runnable @Override public void run () asyncTimeoutFuture = ConfigExecutor.scheduleLongPolling(new Runnable() { @Override public void run () try { getRetainIps().put(ClientLongPolling.this .ip, System.currentTimeMillis()); boolean removeFlag = allSubs.remove(ClientLongPolling.this ); if (removeFlag) { if (isFixedPolling()) { LogUtil.CLIENT_LOG .info("{}|{}|{}|{}|{}|{}" , (System.currentTimeMillis() - createTime), "fix" , RequestUtil.getRemoteIp((HttpServletRequest) asyncContext.getRequest()), "polling" , clientMd5Map.size(), probeRequestSize); List<String> changedGroups = MD5Util .compareMd5((HttpServletRequest) asyncContext.getRequest(), (HttpServletResponse) asyncContext.getResponse(), clientMd5Map); if (changedGroups.size() > 0 ) { sendResponse(changedGroups); } else { sendResponse(null ); } } else { LogUtil.CLIENT_LOG .info("{}|{}|{}|{}|{}|{}" , (System.currentTimeMillis() - createTime), "timeout" , RequestUtil.getRemoteIp((HttpServletRequest) asyncContext.getRequest()), "polling" , clientMd5Map.size(), probeRequestSize); sendResponse(null ); } } else { LogUtil.DEFAULT_LOG.warn("client subsciber's relations delete fail." ); } } catch (Throwable t) { LogUtil.DEFAULT_LOG.error("long polling error:" + t.getMessage(), t.getCause()); } } }, timeoutTime, TimeUnit.MILLISECONDS); allSubs.add(this ); } }
ClientLongPolling 被提交给 scheduler 执行之后,实际执行的内容可以拆分成以下四个步骤:
创建一个调度的任务,调度的延时时间为 29.5s
将该 ClientLongPolling 自身的实例添加到一个 allSubs 中去
延时时间到了之后,首先将该 ClientLongPolling 自身的实例从 allSubs 中移除
对客户端提交上来的 groupKey 进行检查,如果发现某一个 groupKey 的 md5 值还不是最新的,则说明客户端的配置项还没发生变更,所以将该 groupKey 放到一个 changedGroupKeys 列表中,最后将该 changedGroupKeys 返回给客户端
整个过程可以用下面的图进行描述:
当我们在nacos server界面上修改配置文件内容后,对应调用的请求url为:/v1/cs/configs 并且是一个 POST 请求,具体的方法是 ConfigController 中的 publishConfig 方法
1 2 3 4 5 6 7 8 9 10 11 12 13 14 15 16 17 18 19 20 21 22 23 24 25 26 27 28 29 30 31 32 33 34 35 36 37 38 39 40 41 42 43 44 @PostMapping @Secured(action = ActionTypes.WRITE, parser = ConfigResourceParser.class) public Boolean publishConfig (HttpServletRequest request, HttpServletResponse response, @RequestParam(value = "dataId") String dataId, @RequestParam(value = "group") String group, @RequestParam(value = "tenant", required = false, defaultValue = StringUtils.EMPTY) String tenant, @RequestParam(value = "content") String content, @RequestParam(value = "tag", required = false) String tag, @RequestParam(value = "appName", required = false) String appName, @RequestParam(value = "src_user", required = false) String srcUser, @RequestParam(value = "config_tags", required = false) String configTags, @RequestParam(value = "desc", required = false) String desc, @RequestParam(value = "use", required = false) String use, @RequestParam(value = "effect", required = false) String effect, @RequestParam(value = "type", required = false) String type, @RequestParam(value = "schema", required = false) String schema) throws NacosException ... ConfigInfo configInfo = new ConfigInfo(dataId, group, tenant, appName, content); configInfo.setType(type); if (StringUtils.isBlank(betaIps)) { if (StringUtils.isBlank(tag)) { persistService.insertOrUpdate(srcIp, srcUser, configInfo, time, configAdvanceInfo, false ); ConfigChangePublisher .notifyConfigChange(new ConfigDataChangeEvent(false , dataId, group, tenant, time.getTime())); } else { persistService.insertOrUpdateTag(configInfo, tag, srcIp, srcUser, time, false ); ConfigChangePublisher.notifyConfigChange( new ConfigDataChangeEvent(false , dataId, group, tenant, tag, time.getTime())); } } else { persistService.insertOrUpdateBeta(configInfo, betaIps, srcIp, srcUser, time, false ); ConfigChangePublisher .notifyConfigChange(new ConfigDataChangeEvent(true , dataId, group, tenant, time.getTime())); } ConfigTraceService .logPersistenceEvent(dataId, group, tenant, requestIpApp, time.getTime(), InetUtils.getSelfIP(), ConfigTraceService.PERSISTENCE_EVENT_PUB, content); return true ; }
可以看到修改配置后,服务端首先将配置的值进行了持久化层的更新,然后触发了一个 ConfigDataChangeEvent 的事件。notifyConfigChange(ConfigDataChangeEvent event)方法,可以看到最后是调用了NotifyCenter.publishEvent()方法。
1 2 3 4 5 6 7 8 9 10 11 12 13 14 public class ConfigChangePublisher public static void notifyConfigChange (ConfigDataChangeEvent event) if (PropertyUtil.isEmbeddedStorage() && !EnvUtil.getStandaloneMode()) { return ; } NotifyCenter.publishEvent(event); } }
最后调用的是DefaultPublisher#publish()方法。
1 2 3 4 5 6 7 8 9 10 11 12 13 14 15 16 17 18 19 20 21 22 23 24 25 26 27 28 29 30 31 32 33 34 35 36 37 38 39 40 41 42 43 44 45 46 47 48 49 50 51 52 53 54 55 56 57 58 59 60 61 62 public class DefaultPublisher extends Thread implements EventPublisher @Override public boolean publish (Event event) checkIsStart(); boolean success = this .queue.offer(event); if (!success) { LOGGER.warn("Unable to plug in due to interruption, synchronize sending time, event : {}" , event); receiveEvent(event); return true ; } return true ; } void receiveEvent (Event event) final long currentEventSequence = event.sequence(); if (!hasSubscriber()) { LOGGER.warn("[NotifyCenter] the {} is lost, because there is no subscriber." , event); return ; } for (Subscriber subscriber : subscribers) { if (subscriber.ignoreExpireEvent() && lastEventSequence > currentEventSequence) { LOGGER.debug("[NotifyCenter] the {} is unacceptable to this subscriber, because had expire" , event.getClass()); continue ; } notifySubscriber(subscriber, event); } } @Override public void notifySubscriber (final Subscriber subscriber, final Event event) LOGGER.debug("[NotifyCenter] the {} will received by {}" , event, subscriber); final Runnable job = () -> subscriber.onEvent(event); final Executor executor = subscriber.executor(); if (executor != null ) { executor.execute(job); } else { try { job.run(); } catch (Throwable e) { LOGGER.error("Event callback exception: " , e); } } } }
最后subscriber.onEvent(event);对应的Subscriber就在LongPollingService类中
1 2 3 4 5 6 7 8 9 10 11 12 13 14 15 16 17 18 19 20 21 22 23 24 25 26 27 28 29 30 public LongPollingService () allSubs = new ConcurrentLinkedQueue<ClientLongPolling>(); ConfigExecutor.scheduleLongPolling(new StatTask(), 0L , 10L , TimeUnit.SECONDS); NotifyCenter.registerToPublisher(LocalDataChangeEvent.class, NotifyCenter.ringBufferSize); NotifyCenter.registerSubscriber(new Subscriber() { @Override public void onEvent (Event event) if (isFixedPolling()) { } else { if (event instanceof LocalDataChangeEvent) { LocalDataChangeEvent evt = (LocalDataChangeEvent) event; ConfigExecutor.executeLongPolling(new DataChangeTask(evt.groupKey, evt.isBeta, evt.betaIps)); } } } @Override public Class<? extends Event> subscribeType() { return LocalDataChangeEvent.class; } }); }
所以到这里我们就知道了,当我们从 dashboard 中更新了配置项之后,实际会调用到 LongPollingService 的 onEvent 方法。
1 2 3 4 5 6 7 8 9 10 11 12 13 14 15 16 17 18 19 20 21 22 23 24 25 26 27 28 29 30 31 32 33 34 35 36 37 38 39 40 41 42 43 44 45 46 class DataChangeTask implements Runnable @Override public void run () try { ConfigCacheService.getContentBetaMd5(groupKey); for (Iterator<ClientLongPolling> iter = allSubs.iterator(); iter.hasNext(); ) { ClientLongPolling clientSub = iter.next(); if (clientSub.clientMd5Map.containsKey(groupKey)) { if (isBeta && !CollectionUtils.contains(betaIps, clientSub.ip)) { continue ; } if (StringUtils.isNotBlank(tag) && !tag.equals(clientSub.tag)) { continue ; } getRetainIps().put(clientSub.ip, System.currentTimeMillis()); iter.remove(); LogUtil.CLIENT_LOG .info("{}|{}|{}|{}|{}|{}|{}" , (System.currentTimeMillis() - changeTime), "in-advance" , RequestUtil .getRemoteIp((HttpServletRequest) clientSub.asyncContext.getRequest()), "polling" , clientSub.clientMd5Map.size(), clientSub.probeRequestSize, groupKey); clientSub.sendResponse(Arrays.asList(groupKey)); } } } catch (Throwable t) { LogUtil.DEFAULT_LOG.error("data change error: {}" , ExceptionUtil.getStackTrace(t)); } } } void sendResponse (List<String> changedGroups) if (null != asyncTimeoutFuture) { asyncTimeoutFuture.cancel(false ); } generateResponse(changedGroups); }
该run方法有两个逻辑
遍历 allSubs 的队列:首先遍历 allSubs 的队列,该队列中维持的是所有客户端的请求任务,需要找到与当前发生变更的配置项的 groupKey 相等的 ClientLongPolling 任务
往客户端写响应数据:在第一步找到具体的 ClientLongPolling 任务后,只需要将发生变更的 groupKey 通过该 ClientLongPolling 写入到响应对象中,就完成了一次数据变更的 “推送” 操作了
如果 DataChangeTask 任务完成了数据的 “推送” 之后,ClientLongPolling 中的调度任务又开始执行了。这时只要在进行“推送”操作之前,先将原来等待执行的调度任务取消掉就可以了,这样就防止了推送操作写完响应数据之后,调度任务又去写响应数据,这时肯定会报错的。
1、客户端的请求到达服务端后,服务端将该请求加入到一个叫 allSubs 的队列中,等待配置发生变更时 DataChangeTask 主动去触发,并将变更后的数据写入响应对象
在NacosContextRefresher的registerNacosListener中,在接受到有配置修改的情况下,会进行监听器通知,然后这里面会进行RefreshEvent事件的通知
1 2 3 4 5 6 7 8 9 10 11 private void registerNacosListener (final String group, final String dataId) Listener listener = (Listener)this .listenerMap.computeIfAbsent(dataId, (i) -> { return new Listener() { public void receiveConfigInfo (String configInfo) ... NacosContextRefresher.this .applicationContext.publishEvent(new RefreshEvent(this , (Object)null , "Refresh Nacos config" )); . ... }; });
这里RefreshEvent事件对应的监听器为RefreshEventListener:
1 2 3 4 5 6 7 8 9 10 11 12 13 14 15 16 17 18 19 20 21 22 23 24 25 26 27 28 29 30 ```java public class RefreshEventListener implements SmartApplicationListener private static Log log = LogFactory.getLog(RefreshEventListener.class); private ContextRefresher refresh; private AtomicBoolean ready = new AtomicBoolean(false ); ... public void onApplicationEvent (ApplicationEvent event) if (event instanceof ApplicationReadyEvent) { this .handle((ApplicationReadyEvent)event); } else if (event instanceof RefreshEvent) { this .handle((RefreshEvent)event); } } public void handle (ApplicationReadyEvent event) this .ready.compareAndSet(false , true ); } public void handle (RefreshEvent event) if (this .ready.get()) { log.debug("Event received " + event.getEventDesc()); Set<String> keys = this .refresh.refresh(); log.info("Refresh keys changed: " + keys); } } }
从上文可以看到this.refresh.refresh()这里调用了ContextRefresher类对象refresh方法对@Refresh Bean对象刷新。
1
2
3
4
5
public synchronized Set<String> refresh () Set<String> keys = refreshEnvironment(); this .scope.refreshAll(); return keys; }
scope为RefreshScope对象。
服务是否需要自动更新配置,这个根据自身的业务去决定。在有灰度发布的场景,如果配置自动更新,再调整配置过后,那么全部实例都会生效,这样可能引发生产事故,随时被大佬约去喝茶;在没有灰度的场景下,可以配置自动更新,修改配置后不需要重启服务。
客户端是通过一个定时任务来检查自己监听的配置项的数据的,一旦服务端的数据发生变化时,客户端将会获取到最新的数据,并将最新的数据保存在一个 CacheData 对象中,然后会重新计算 CacheData 的 md5 属性的值,此时就会对该 CacheData 所绑定的 Listener 触发 receiveConfigInfo 回调,从而刷新@Refresh Bean对象。
Nacos 客户端会循环请求服务端变更的数据,并且超时时间设置为30s,当配置发生变化时,请求的响应会立即返回,否则会一直等到 29.5s+ 之后再返回响应。
Nacos 客户端能够实时感知到服务端配置发生了变化。
实时感知是建立在客户端拉和服务端“推”的基础上,因为服务端和客户端直接本质上还是通过http进行数据通讯的,之所以有“推”的感觉,是因为服务端主动将变更后的数据通过 http 的 response 对象提前写入了。